Getting Started
1. Prepare the development environment
- Download the latest version of theArduino IDE
- Launch the Arduino IDE and open its settings under the "File" or "Arduino IDE" tab
- In the Additional Boards Manager URLs field paste the following: https://dl.espressif.com/dl/package_esp32_index.json and click OK.
- Go to Tools > Board > Boards Manager...
- Enter “ESP32” in the search field and click Install in the search result titled “ESP32 by Espressif Systems” (select version 3.1.1, currently more recent versions are not supported)
- The board definitions are now downloaded and installed. INSTALLED appears when it is ready.
2. Install Mozzi and MIDI libraries
- In Arduino IDE go to Tools > Manage Libraries...
- Type "Mozzi" into the search bar
- The only result should be "Mozzi by Tim Barrass". Install version 2.0.1
- Type "MIDI Library" into the search bar and press enter
- Install the latest version of the library by Francois Best, Iathoub
3. Install MEAP Library
- Download and unzip the MEAP code repository (click the green "Code" button and press "download ZIP)"
- Locate your Arduino sketchbook directory by opening the Settings menu in the Arduino IDE and noting the path listed at the top of the window.
- Copy the Meap-main folder to the library folder within the sketchbook directory
4. Uploading an example program
- Open the "MEAP_HW_TEST.ino" file within the
Testing and Templatesdirectory inside of theexamplesfolder of Meap-main using the Arduino IDE. - Connect your MEAP to your computer using a USB data cable (be sure that you are not using a charging-only cable)
- At the top of the Arduino IDE window, open the board selection menu and choose "Select other board and port"
- For Boards, choose "ESP32S3 Dev Module, and for Ports, choose the USB device that appears when MEAP is plugged in.
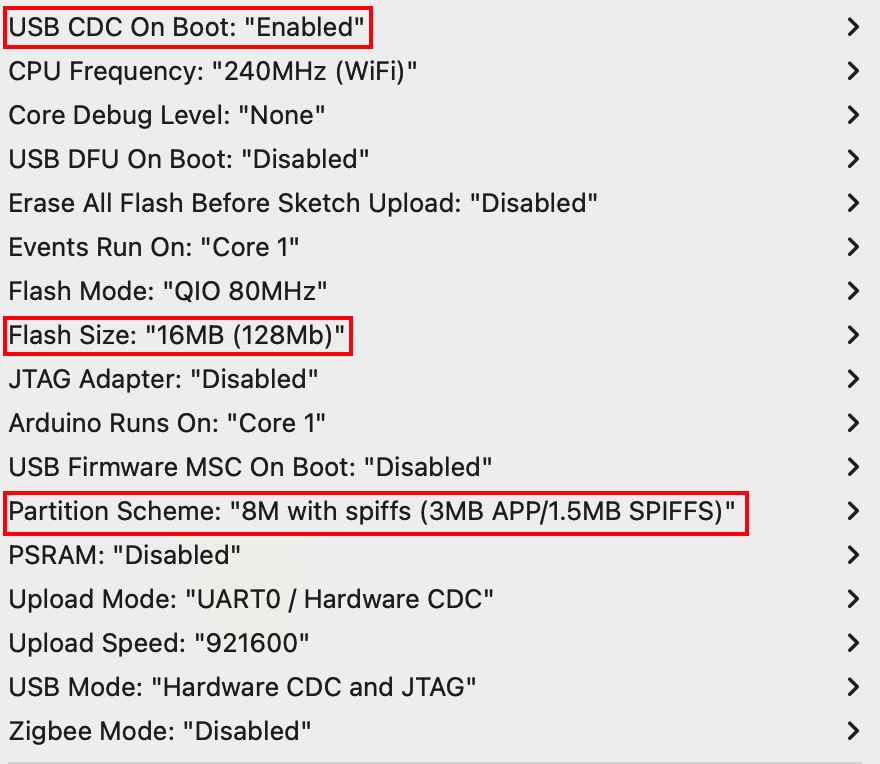
- Set all of your board configuration options in the "tools" menu as shown below. You will likely only need to change the highlighted settings.
- Press the upload button within the Arduino IDE. This is the right-facing arrow in the top left of the window.
- Wait a few seconds until it is done uploading.
- Switch the speaker on (or plug in headphones) and turn up the volume knob and you should hear two tones playing.
- Open the serial monitor by pressing the magnifying glass in the top right of the window.
- Try pressing touch pads or toggling DIP switches, the serial monitor at the bottom of the window should tell you which pads/switches you are pressing.

5. Learn to use your MEAP
You're ready to make some fantastic music! I recommend looking through the Basic tutorials to learn the basics of MEAP's audio engine and hardware peripherals.
Optional Advanced Setup
Expanding memory map
The ESP32S3 chip used on MEAP comes with 16MB of Flash memory, however the default memory maps in the Arduino IDE do not allow you to use all of it. If you are working with large samples or wavetables you can quickly fill up that limited memory so you may want to create a custom memory map. To do this we will need to edit the ESP32 board configuration files that were installed in step 1 above. NOTE: if your Arduino IDE updates your ESP32 board definitions, it will likely overwrite these changes and you will need to repeat this process.
- Locate your board definitions:
This location may vary depending on your operating system. On my mac they are located at
/Users/masonmann/Library/Arduino15 - Navigate to ESP32 Board definitions
Go to
packages/esp32/hardware/esp32/3.x.x/ - Open "boards.txt" in your text editor of choice
- Navigate to the esp32s3 section by searching "esp32s3"
- At the end of the section where each line begins with esp32s3.menu.PartitionScheme.default
Edit the last three lines as follows.
esp32s3.menu.PartitionScheme.custom=Custom
esp32s3.menu.PartitionScheme.custom.build.partitions=meap
esp32s3.menu.PartitionScheme.custom.upload.maximum_size=16646144
- Navigate to tools/partitions
- You can now utilise all 8MB of memory by selecting "Custom" as your partition scheme under the Arduino tools menu.